Wednesday, February 27, 2013

Solution to ORA-48913 caught while writing to trace file

On 11.2.0.3, encountered the following error in the alert.log:

Non critical error ORA-48913 caught while writing to trace file "/oraotcprd1/app/oracle/diag/rdbms/otcprd1/OTCPRD11/trace/OTCPRD11_ora_14925.trc"
Error message: ORA-48913: Writing into trace file failed, file size limit [10485760] reached

The reason was Parameter MAX_DUMP_FILE_SIZE  is set too low.

Solution

We can increase the setting for the parameter MAX_DUMP_FILE_SIZE or set it to unlimited

MAX_DUMP_FILE_SIZE specifies the maximum size of trace files (excluding the alert file). Change this limit if you are concerned that trace files may use too much space.
  • A numerical value for MAX_DUMP_FILE_SIZE specifies the maximum size in operating system blocks.
  • A number followed by a K or M suffix specifies the file size in kilobytes or megabytes.
  • The special value string UNLIMITED means that there is no upper limit on trace file size. Thus, dump files can be as large as the operating system permits.

Reference: http://docs.oracle.com/cd/E14072_01/server.112/e10820/initparams131.htm

Solution to ORA-04030: out of process memory

Today I encountered following error, while trying to run "Purge Logs and Closed System Alerts" to purge data from "FND_LOG_MESSAGES" table.

ORA-04030: out of process memory when trying to allocate 82456 bytes (pga heap,control file i/o buffer)
ORA-04030: out of process memory when trying to allocate 16328 bytes (koh-kghu sessi,pmuccst: adt/record)

The values for the _PGA_MAX_SIZE and PGA_AGGREGATE_TARGET has been set to values even greater than the 4GB, but yet the same errors persist when 4GB is used.

The trace file also confirms that the process is limiting at 4GB.

=======================================
PRIVATE MEMORY SUMMARY FOR THIS PROCESS
---------------------------------------
******************************************************
PRIVATE HEAP SUMMARY DUMP
4074 MB total:                                      
4072 MB commented, 192 KB permanent
1131 KB free (768 KB in empty extents),
4071 MB, 1 heap: "session heap "

These errors usually show up because of running out of map entries from the OS.
There are only 65536 memory map entries per process.

Solution

Change the upper limit at either the OS or at the database level:

  • Change the page count at the OS level:
by root user,
$ more /proc/sys/vm/max_map_count
$ sysctl -w vm.max_map_count=200000 (for example)
OR at database level,
  • Adjust the realfree heap pagesize within the database by setting the following parameters in the init/spfile and restart the database.

_use_realfree_heap=TRUE
_realfree_heap_pagesize_hint = 262144
The default realfree allocator pagesize is 64 KB (65536) , so 64K entries take up 4GB. With 256KB (262144) pages, the limit goes to 16GB.


Checkpoint & SCN

What is System Change Number (SCN)?

The SCN is a stamp that defines a committed version of a database at a point in time. Oracle assigns every committed transaction a unique SCN. The value of a SCN is the logical point in time at which changes are made to a database. This number is utilized by Oracle to log the changes made to the database.

SCN is a 6 Byte (48 bit) number whose value is 281,474,976,710,656 and represented as 2 parts - SCN_BASE and SCN_WRAP. An SCN_BASE is a 4 Byte (32 bit) number and SCN_WRAP is a 2 Byte (16 bit) number. Whenever SCN_BASE reaches its maximum (2 power 32 = 4294967296 ), SCN_WRAP is increased by one and SCN_BASE will be reset to 0. This continues until SCN_WRAP reaches its maximum, i.e. 2 power 16 = 65536.

SCN = (SCN_WRAP * 4294967296) + SCN_BASE

Even if the SCN value does reach its maximum, then SCN will be reset to 0, thus causing a new incarnated database. So, all your old backups and archived logs becomes useless and you need to take fresh backups.

SCN is incremented with the completion of each and every transaction. A commit does not write to datafiles at all. It does not update control files at all.

The SCN is written to the controlfiles when the control files are updated - which happens as the result of a few things, one being "end of official checkpoint".

SCN's are written to redo logs continuously - when you commit they are emitted into the redo stream, and semantically speaking, after the checkpoint COMPLETES, not after the checkpoint is INITIATED.

The current SCN can be obtained by either of the following queries:

select dbms_flashback.get_system_change_number scn from dual;

select current_scn from v$database;


What is a Checkpoint?

A checkpoint is the act of flushing modified, cached database blocks to disk. Normally, when you make a change to a block the modifications of that block are made to a memory copy of the block. When you commit the block, it is not written to the datafile but it is written to the REDO LOG, so we can "replay"  a transaction in the event of an instance failure. Eventually, the system will checkpoint your modified blocks to the datafiles on disk.

A checkpoint number is the SCN number at which all the dirty buffers are written to disk. There can be a checkpoint at object/tablespace/datafile/database level.

A successful checkpoint guarantees that all database changes up to the checkpoint SCN have been recorded in the datafiles. As a result, only those changes made after the checkpoint need to be applied during instance recovery.

The goal of a checkpoint is to get dirty buffers from the SGA onto disk safely.

Events that make checkpoint to occur:
  • When a redo log switch occurs.
  • Whenever the time set by the LOG_CHECKPOINT_TIMEOUT parameter is reached.
  • By issuing the command 'alter system switch logfile' or 'alter system checkpoint'.

The checkpoint process updates the control file when a checkpoint is performed. Remember that a checkpoint operation writes all changed (dirty) blocks to disk. By recording this fact in the control file, Oracle knows what redo records need to be applied in the event of an instance failure. To recover from an instance failure, Oracle needs to apply all redo generated after the last checkpoint recorded in the control file.

DBWR writes dirty blocks from the buffer cache to disk -- that does not happen when you "commit" -- LGWR is involved during a commit.

When the log buffer is 1 MB full, 1/3 full, every 3 seconds or every commit - whichever comes first - those all trigger redo writes
DBWR <--- checkpoint
LGWR <--- commit

NOTE:
  • Log switches cause checkpoints. Checkpoints do not cause log switches.
  • When the checkpoint is complete, the redo logs that protected the now checkpointed data are not needed for instance recovery anymore.

Sunday, February 24, 2013

Unbuffered versus Registered ECC Memory – Difference between ECC UDIMMs and RDIMMs


Today, the vast majority of memory used by desktops, notebooks, and mobile devices is unbuffered non-ECC (Error Checking and Correction) DRAM. In fact, unless one is running an Intel or AMD CPU that can support ECC memory unbuffered ECC DRAM is the only choice for most users. Intel Xeons, for example, support ECC memory, while even the new Core i7′s do not. AMD has much broader ECC support at the CPU level, but many AMD motherboards do not support ECC memory features so it is not universal.

ECC MEMORY WHAT IT DOES

Error Checking and Correction (ECC) memory is mostly considered essential in enterprise environments these days. Single bit error checking and correction within an 8-bit byte allows for single bit errors to be both detected and corrected when they occur. Interestingly enough, the way this single bit ECC works is not all that unlike RAID 4 and RAID 5 where an XOR algorithm is used to generate parity bits. Instead of losing usable memory capacity, memory makers tend to add an additional chip to ECC memory for every eight storage chips. When a single bit error is detected, the parity information is used to reconstruct the data with an error. Again, this is conceptually similar to how RAID 4 and RAID 5 can scrub and fix data errors in storage arrays. Larger errors than multi-bit can be detected but not corrected by the single bit ECC type of parity scheme.
For desktops, this is less important as a lot of figures put single-bit errors in the range of 1 per 1GB or 1 per 2GB of memory each month. To a desktop user, this may cause a program to crash, or at worst require a reboot. In servers, ECC is essential to maintaining both data integrity and uptime. With the current minor cost differential of ECC versus non-ECC unbuffered DIMMs, there is little reason to get non-ECC memory for a server.

UNBUFFERED ECC VERSUS REGISTERED ECC MEMORY

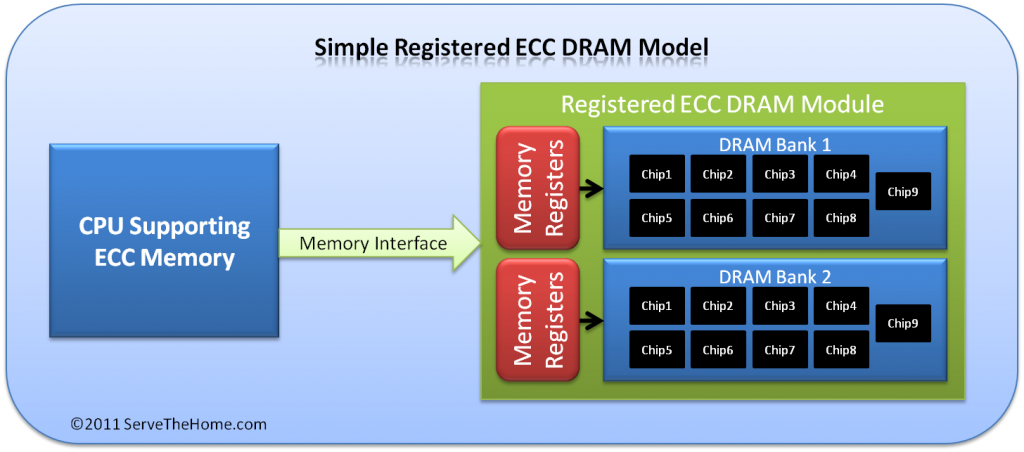
Adding to the ECC concept, there are two concepts at play, unbuffered and registered ECC memory modules. The basic difference is that memory commands in unbuffered memory configurations go directly from the controller to the memory module, while in registered memory configurations the commands are sent first to the memory banks’ registers prior to being sent to the modules. This concept may sound difficult, but here is the very simple/ conceptual view regarding what is going on.
In the above example the memory controller accesses the memory banks directly. The above assumes that the memory controller resides within the CPU package as it does in modern CPU architectures. Looking at older systems, the memory controller resided within the CPU northbridge. Compare this to the registered memory example below.
Simple Unbuffered ECC DRAM Model
Here the CPU communicates with the registers for the banks of memory on each module. From there, these registers communicate with the DRAM. The implications of this are twofold. First, on a negative side, instructions take approximately one CPU cycle longer due to the intermediary of the bank register. On the positive side, this buffering reduces the strain on the CPU’s memory controller because it points to the dedicated intermediary register versus accessing the DRAM directly. It is easier on the memory controller to deal with a fewer number of targets.
Simple Registered ECC DRAM Model
This feature is very important in server scenarios because, for example, an Intel 3400 series platform, such as the Supermicro X8SI6-F or Intel S3420GPLC supports 16GB unbuffered ECC and 32GB registered ECC memory. Likewise, in dual processor systems, such as the E5600 series based Supermicro X8DTH-6F recently reviewed on ServeTheHome, the delta is much greater with up to 48GB of unregistered ECC or 192GB of registered ECC memory. For virtualization environments where memory, and memory bandwidth is key to achieving high consolidation and density metrics, Registered ECC memory is generally the way to go. If one purchases a server with unregistered ECC DIMMs, then requires additional capacity, then the upgrade operation will require a pull and replace all UDIMM modules making it an expensive proposition.

CONCLUSION

In this article hopefully one can get a conceptual view of the difference between the unbuffered ECC memory and registered ECC memory to help inform selection decisions.

Saturday, February 23, 2013

Details of Adpreclone and Adcfgclone, when it runs

What happens when you run adpreclone and adcfgclone. The below steps give you better understanding and enhance your troubleshooting skills.

When you run this commnad adpreclone.pl dbTier . This will run in two steps Techstack and database.

Techstack:
It will create following directories in the ORACLE_HOME/appsutil/clone & Jlib, db, data where “Jlib” relates to libraries, “db” will contain the techstack information, “data” will contain the information related to datafiles and required for cloning.

It creates driver files at ORACLE_HOME/appsutil/driver/instconf.drv

It converts inventory from binary to xml, the xml file is located at $ORACLE_HOME/appsutil/clone/context/db/Sid_context.xml

Prepare database for cloning:
This includes creating datbase control file script and datafile location information file at
$ORACLE_HOME/appsutil/template
adcrdbclone.sql, dbfinfo.lst

Generates database creation driver file at ORACLE_HOME/appsutil/clone/data/driver
data.drv

Copy JDBC Libraries at ORACLE_HOME/appsutil/clone/jlib/classes12.jar and appsoui

When Running adpreclone appsTier

This will create stage directory at $COMMON_TOP/clone. This also run in two steps.

Techstack:Creates template files for
Oracle_iAS_Home/appsutil/template
Oracle_806_Home/appsutil/template

Creates Techstack driver files for
IAS_ORACLE_HOME/appsutil/driver/instconf.drv
806_ORACLE_HOME/appsutil/driver/instconf.drv

APPL_TOP preparation:
-It will create application top driver file$COMMON_TOP/clone/appl/driver/appl.drv
-Copy JDBC libraries$COMMON_TOP/clone/jlib/classes111.zip

Now Shutdown all the services of Application and database for Copy the file System to target location

Configuring the target systemOnce it is done . Run as below adcfclone.pl for apps Tier and dbTier.

On database side:cd $ORACLE_HOME/appsutils/clone/binperl adcfgclone.pl dbTier pwd=apps
This will use the templates and driver files those were created while running adpreclone.pl on source system and has been copied to target system.

Following scripts are run by adcfgclone.pl dbTier for configuring techstack

adchkutl.sh — This will check the system for ld, ar, cc, and make versions.
adclonectx.pl — This will clone the context file. This will ceate a new context file as per the details of this instance.
runInstallConfigDriver — located in $Oracle_Home/appsutil/driver/instconf.drv
Relinking $Oracle_Home/appsutil/install/adlnkoh.sh — This will relink ORACLE_HOME

For data on database side, following scripts are run
Driver file $Oracle_Home/appsutil/clone/context/data/driver/data.drv
Create database adcrdb.zip
Autoconfig is run
Control file creation adcrdbclone.sql

On Application Side:COMMON_TOP/clone/bin/perl adcfgclone.pl appsTier pwd=apps
Following scripts are run by adcfgclone.pl
Creates context file for target adclonectx.pl

Run driver files
$ORACLE_HOME/appsutil/driver/instconf.drv
$IAS_ORACLE_HOME/appsutil/driver/instconf.drv

Relinking of Oracle Home$ORACLE_HOME/bin/adlnk806.sh$IAS_ORACLE_HOME/bin/adlnkiAS.sh
At the end it will run the driver file $COMMON_TOP/clone/appl/driver/appl.drv and then runs autoconfig.